Skip to search
Skip to main content
Digital Commonwealth
Folders
Sign Up / Log In
Search for
Search
Search
Search
Basic
Advanced
Explore
Map
Collections
Institutions
Formats
For Educators
Primary Source Sets
Lesson Plans
Using Primary Sources
Searching Digital Commonwealth
For Institutions
Join Digital Commonwealth
Conferences, Trainings, & Events
How to Contribute Collections
Digitization Services
Board & Committees
Frequently Asked Questions
About
About Digital Commonwealth
News & Announcements
Copyright & Terms of Use
Harmful Content Statement
Partners
API
Contact Us
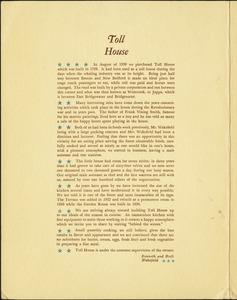
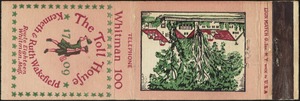
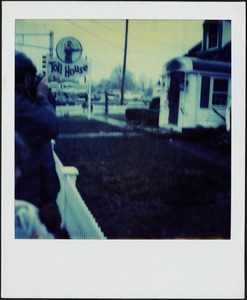
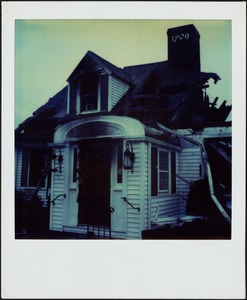
Whitman Public Library
Ruth Graves Wakefield/Toll House Collection
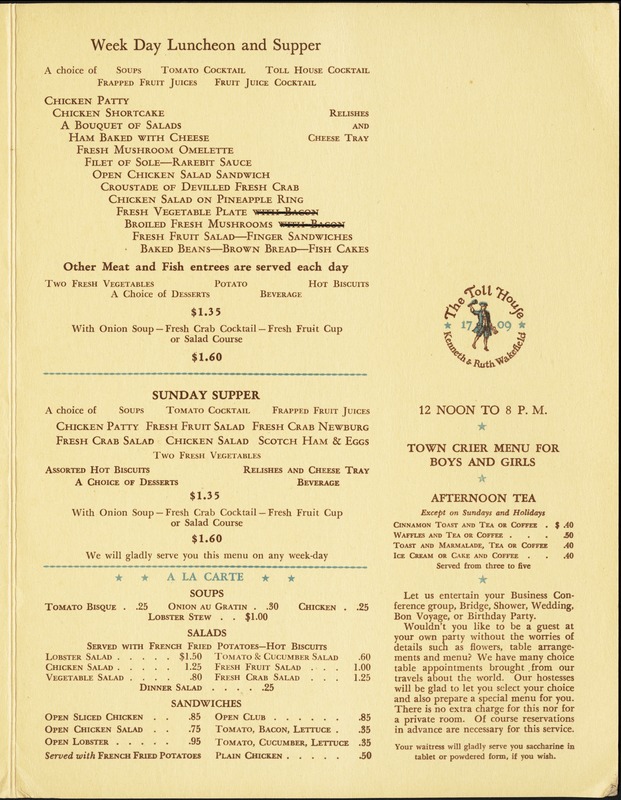
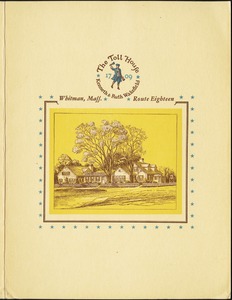
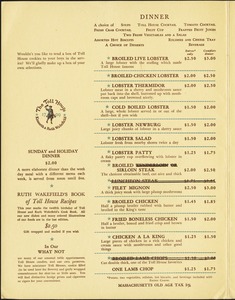
The Toll House menu
Viewing image 3 of 4
< Previous
Next >
The Toll House menu
×
Previous
Next
Item Information
Title:
The Toll House menu
Date:
[ca. 1975–1985]
Format:
Ephemera
Genre:
Menus
Location:
Whitman Public Library
Collection (local):
Local History Collection
Series:
Ruth Graves Wakefield/Toll House Collection
Subjects:
Restaurants
Toll House (Whitman, Mass.)
Places:
Massachusetts
>
Plymouth (county)
>
Whitman
Extent:
[4] p. : 1 ill. ; 28 x 22 cm
Permalink:
https://ark.digitalcommonwealth.org/ark:/50959/8049gk634
Terms of Use:
No known copyright restrictions.
No known restrictions on use.
Language:
English
Notes:
Title from accompanying materials.
Notes (date):
Date from accompanying materials.
Identifier:
1
show more...
View MODS XML
More Like This
The Toll House matchbook
Toll House
Toll House
Toll House
Find More Like This >>
Tools
Share
Facebook
Pinterest
X
Reddit
Tumblr
Email
Copy link
Add to Folder
Questions/Comments
Cite This Item
Downloads
Primary (full resolution, uncompressed)
(TIF, multi-file ZIP, 313 MB)
Large (full resolution)
(JPEG, multi-file ZIP, 2.77 MB)
Medium
(JPEG, multi-file ZIP, 654 KB)